

Digital Samba is a web-based platform that enables users to seamlessly integrate virtual meeting rooms into their web applications, allowing for efficient virtual communication without switching between platforms. These virtual rooms come equipped with features like screen sharing, chat, video conferencing, and more, making them an ideal solution for businesses and remote teams.
In order to maximise the benefits of Digital Samba Embedded, full customisation is key. This article will delve into how to tailor Digital Samba meeting rooms using the Digital Samba API and SDK, providing users with a comprehensive guide to optimise their virtual communication experience.
Table of Contents
- What you’ll need
- How to configure your Digital Samba room using the API?
- How to configure your Digital Samba room using the SDK?
What you’ll need
Before diving into the configuration process, let's discuss what you'll need to start.
-
Digital Samba Account
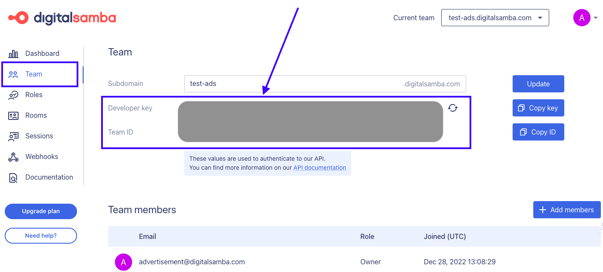
You'll need a Digital Samba account to access the platform and access your API Key, which will authenticate your request to the API using your Team ID and Developer key in a standard HTTP "Authorisation" header.
You can find your Team ID and Developer key in the dashboard’s ‘Team’ option, as shown below.
You can create a free account here if you need to sign up.
-
Create a video conferencing room
Next, you’ll need to create a room if you have not already created one. You can create a room using the dashboard or REST API with Digital Samba. For this article, we will create the room using the REST API. You can learn how to configure a room with the dashboard here.
To create a new room using the REST API, you must execute a POST request against the /room endpoint and authenticate the request using your Team ID and Developer Key in the POST request, as shown in the code sample below. When creating your room, you’ll also need to set up the privacy field, which can be ‘public’ or ‘private’.
If you are doing moderated meetings, you’ll also need to set roles for your participants: moderator, speaker, or attendee. You can add more roles if you wish, and also set a default role. You can learn more here.
Here is an example of a POST request you can use to create a room:
If you’d rather take the JavaScript route, you can use the following code to create a new room:
Important: Do not leak your developer key into the client’s browsers. Execute these requests only from your backend (server-side). Note, you must do a base64 encoding of the concatenation of your teamId and developer key, but this is out of the scope of the article. Every major language provides built-in functions to base64 encode data.
You can access the detailed documentation here.
The Digital Samba API will respond with your room id, a room_url, privacy status, and the user roles. The new room created will be accessible at https://teamNameHere.digitalsamba.com/room_id, where the team name is your team name, and the room_id is the id in the response.
Instead of the room id, you can also use a friendly_url, you can learn more about friendly_urls here.
Embed the room on your page.
Once your room is set up, you can embed it on your web page using an iframe with the following attributes:
With the room set up, you can now use the room fields to configure your room; we’ll look at this later.
-
Ensure you embed the SDK into your platform
Now that you’ve integrated the Digital Samba video conference with the API, you can customise and control it using the Digital Samba video SDK. But before that, you need to embed the Digital Samba SDK onto your platform.
- Start by importing the DigitalSambaEmbedded module from the @digitalsamba/embedded-sdk library. Keep in mind that the SDK is written in TypeScript.
- Next, you'll interact with the `DigitalSambaEmbedded` class to create a video conferencing frame within the child of the parent element. You can set the HTMLElement where you’d like to create the frame. If not, the SDK will automatically create a frame within your UI.
- You’ll then need to define `initOptions` that include details like the room URL, team name, room name, and optional authentication token.
- Lastly, call the `load` method, which will load the room into the designated HTML element or iframe.
Let’s have a look at a code sample that sets all the above up:
You can also set `instanceProperties` in the load method to set attributes and handle error reporting. For a more detailed guideline, please refer to our documentation here.
Let’s explore how to configure your room using the Digital Samba API and SDK.
How to configure your Digital Samba room using the API
The API will allow you to manage the backend of your video conference room at a more granular level. To edit an existing room, you must execute a PATCH request against the /rooms/:id endpoint.
For instance, if you’re using Digital Samba for virtual lectures, you can enable screen-sharing for all your rooms to present slides and enable the chat feature to allow students to ask questions or provide feedback without interrupting the lecture. You can also restrict students’ cameras and microphones to prevent distractions as students join the lecture.
Let’s see how you can achieve this using bash code.
If you're building a web application with JavaScript, you can use the following code to achieve the same.
With the Digital Samba API, you can update as many fields as you wish from functionality and features, room layout, branding and personalisation, and permissions to security options – here is a full list of all the fields you can customise.
How to configure your Digital Samba room using the SDK?
The SDK allows you to customise and control your front end to match your required use cases. Additionally, you can define the complexity of the UI and use your own personalised front-end functionalities on the server side since it’s written in TypeScript.
With the SDK, you can use Methods to control the call, Events to which you can subscribe to various things that are happening inside the room, and Properties that give you information about the running conference.
For instance, if you've embedded the Digital Samba SDK into your telehealth web app, you might want to create a custom participant panel. This panel gives you control over what your patients can do and the features they can access.
In this situation, you can let moderators give permission to certain users. This permission allows users to turn on their cameras and microphones—but only when approved by the moderator. You can also control who can share their screen. Moderators get the final say in allowing users to share their screens, adding an extra layer of control.
These methods use the participant_id parameter to make sure that only that particular user is allowed to broadcast or share their screen.
What’s most powerful about using the SDK to configure your video conferencing app is the ability to add custom features, custom layouts and extensibility – meaning you can add new features that might not be available with the API or dashboard.
For instance, you can develop a custom participants panel that gives the moderator diverse control over the meeting. You can include capabilities such as broadcasting, screen sharing, listing users, as well as recording features using the methods provided by the Digital Samba SDK.
Each of these methods comes with an Event that you can subscribe to and customise how your UI functions or responds when the methods are triggered.
The Digital Samba Embedded offers a diverse range of options that help you customise and personalise the video conferencing experience for your users while ensuring you get the most out of your video calls, virtual meetings, and virtual events.
You can explore our documentation for a comprehensive guide on configuring rooms using our API and video conferencing SDK.
Share this
How to Configure Your Team Settings with the Digital Samba Developer API
Easy Steps to Integrate Video Call on Your Website
%20(1)-1.png)