

The Digital Samba SDK makes it easy for developers to add video conferencing to their own applications. It has many features that allow developers to customise and control the video conferencing experience, such as the ability to join and control the conference programmatically.
This article will teach you how to integrate the video room SDK and control an embedded video conference. You will learn how to:
- Add the Digital Samba SDK to your application
- Join a video conference
- Control the video conference, such as muting and unmuting microphones, turning cameras on and off, sharing screens, etc.
Table of Contents
- Join and control embedded video conferences with Digital Samba SDK
- Getting Digital Samba room_url
- Integrating the Digital Samba SDK to the application
- Joining the video conference
- Digital Samba SDK video conference controls
- Conclusion
Whether you are developing a custom video conferencing application or simply want to add video conferencing capabilities to your existing application, the Digital Samba SDK is a great option.
Prerequisites:
- A Digital Samba developer account (create one here)
- A computer with internet connectivity
- Basic knowledge of JavaScript/TypeScript
If you have all of the above, you're ready to get started!
Join and control embedded video conferences with Digital Samba SDK
Follow the steps below to join and control video conferences utilising the Digital Samba SDK:
1. Getting Digital Samba room_url
Initialising the Digital Samba SDK requires your room_url, which is the link to your room. You can get this through the dashboard or the Digital Samba API. Here's how to do both:
Through the dashboard:
1. Go to https://dashboard.digitalsamba.com/ and click "Rooms" in the left sidebar.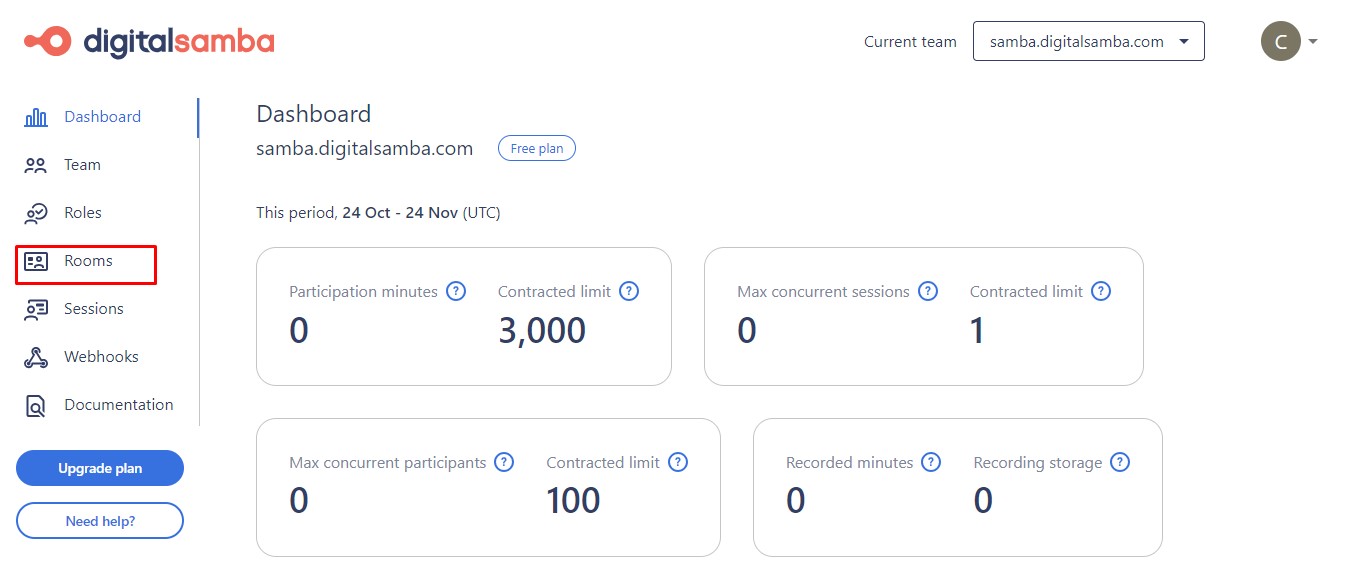
2. You'll see any rooms you've created. By default, there's a "demo-room". You can also create a new room by clicking "Create new room".

3. Make your desired configurations and click "Create room".
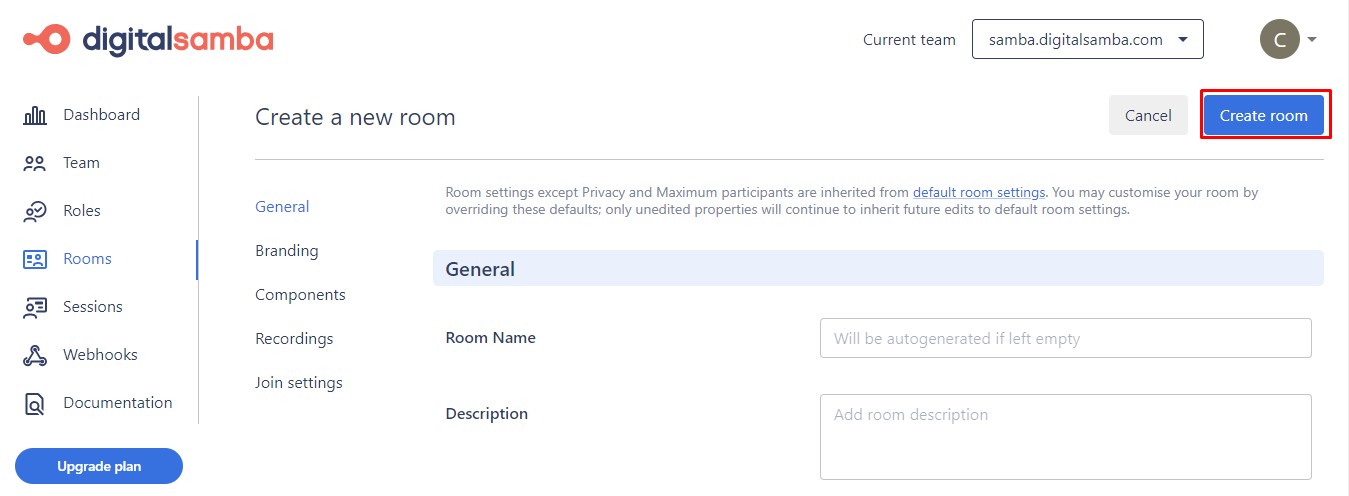
4. Copy the room link by clicking "Copy link". That's it!

Get room url from API:
To get your room URI from the Digital Samba API:
1. Make a GET request to list your rooms:Replace <YOUR_TEAM_ID> and <YOUR_DEVELOPER_KEY> with the actual values. You can find it under the "Teams" section in your dashboard.
2. In the response, find the "friendly_url" for the desired room. It will be under the "data" array:
3. Append this friendly_url to your team domain to form the full room_url:
For more details on room management like creation and editing, see the Digital Samba API docs.
2. Integrating the Digital Samba SDK to the application
There are two main ways to add the Digital Samba SDK to your project:
- Using a CDN
- As an NPM package
Follow these steps for each method:
Using a CDN:
To add the SDK quickly for prototyping, use a <script> tag to load it from the unpkg public CDN:
As an NPM Package:
For use in production, it's best to use npm and a bundler like Webpack. That being said, let’s get started!
1. Install the SDK with NPM or Yarn
npm:
Or install with Yarn:
2. Import the SDK
After installing, you can use the SDK by importing it:
3. Joining the video conference
Joining the video conference is easy. Just initialise the SDK and load it using the room_url we created earlier. Then call .load() to get it running. To initialise the SDK and join, you can use this code snippet:
4. Digital Samba SDK video conference controls
Now that you have successfully set up the Digital Samba SDK, you can start adding video conference controls to your app. The SDK provides many ways to control video conferences, so you can create real-time communication apps that meet your needs. In this tutorial, we will focus on implementing the following essential controls:
- Mute/Unmute microphone
- Start/Stop video
- Screen sharing
- Record
- Virtual background
- View participants
- Leave call
- End call
Sounds cool, right? Let's get started!
4.1 Mute and unmute microphone
You can mute your microphone to eliminate background noise, and unmute it to speak when needed. This is helpful for minimising distractions.
To mute your microphone, call the disableAudio() method:
To unmute your microphone, call the enableAudio() method:
4.2 Start and stop video
You can turn on your camera to start a video, and turn it off to step away or conserve bandwidth. Toggling video on and off is helpful for privacy and reducing network usage.
To start a video, call the enableVideo() method:
To stop a video, call the disableVideo() method:
4.3 Screen sharing
Screen sharing lets you present slides, documents, or apps to other participants by sharing your screen. This is useful for presentations, tutorials, collaboration, and more.
To enable screen sharing, call the allowScreenshare() method with the user ID of the person you want to grant permission to:
Allow or disallow screen share
To disable screen sharing, call the disallowScreenshare() method:
Start or stop screen share
To start sharing your screen, call the startScreenshare() method:
To stop sharing your screen, call the stopScreenshare() method:
4.4 Record
You can record a video meeting to the Digital Samba's cloud storage. This is helpful for creating an archive of the meeting for future reference. You can access recorded meetings through the Digital Samba’s Dashboard or via the API.
To start recording, call the startRecording() method:
To stop recording, call the stopRecording() method:
4.5 Virtual background
You can apply a virtual background image, such as a photo or office setting, to replace your real background. This is useful for privacy or visually enhancing bland environments.
Enable or disable virtual background
To enable a virtual background, call the enableVirtualBackground() method:
To remove a virtual background, call the disableVirtualBackground() method:
Configure virtual background
You can also configure your virtual background using the configureVirtualBackground() method:
The configureVirtualBackground() method turns on or changes the virtual background for the local user with the given options. Either the blur, image, or imageUrl field must be specified. The enforce parameter is optional, and if set to true, the local user cannot change the virtual background manually once they enter the room.
4.6 View participants
You can see a list of users currently in the meeting. This is helpful for confirming who is present and managing large meetings.
To retrieve a list of users, call the listUsers() method:
4.7 Leave call
You can gracefully exit the meeting while others continue. This is useful for stepping away temporarily or leaving before the call ends.
To leave the meeting, call the leaveSession() method:
4.8 End call
When you are finished, you can end the video conference for all participants.
To end the call, use the endSession() method:
To learn more about the Digital Samba SDK and its methods, please visit the documentation.
Conclusion
The Digital Samba Embedded makes it easy to add video conferencing to your app. Just follow the steps in the documentation to start a meeting, connect participants, and control video and audio. You can also use powerful features like screen sharing and virtual backgrounds. With just a few lines of code, you can add immersive collaboration experiences to your product.
Why the wait? Sign up today to build robust video conference applications.
Share this
How to Embed a Video Conference Widget with the Digital Samba SDK
Easy Steps to Integrate Video Call on Your Website