Embedding a video conferencing API lets you add real-time video calls directly to your website or app, without building WebRTC infrastructure from scratch. With Digital Samba, you create a room through the REST API, generate a participant token, then load the prebuilt video interface with the JavaScript SDK – typically in under an hour. This guide walks through the full process, with code examples, a WordPress option and answers to common questions.
Adding video conferencing to your website is no longer a luxury – it is essential for creating real-time human connection. Whether you are building a virtual classroom, supporting remote teams or hosting online events, a reliable video conferencing API lets you embed video calls directly into your website or app.
Table of contents
- Why add video conferencing to your website?
- Step-by-step guide: Embed video call on your website with Digital Samba API
- Customising the embedded video conferencing experience using Digital Samba SDK
- Using SDK events and methods to manage events in real-time
- Digital Samba embedded WordPress plugin: Effortless WebRTC integration
- Maximise your website's potential by integrating Digital Samba video conferencing
- FAQs: Everything you need to know on how to embed video chat to your website
It's also crucial to remember that you can integrate Digital Samba video conferencing into your website or app using our API for developers or our WordPress Plugin for WordPress websites. The API allows for effortless integration with a few lines of HTML code. At the same time, the WordPress Plugin offers simple, GDPR-compliant video conferencing and webinars with various features such as screen sharing, text chat, closed captioning, and virtual background.
Let’s explore why embedded video conferencing is a must-have feature for websites across education, healthcare, customer support, and more.
Why add video conferencing to your website?
Adding video conferencing functionality to your website is more than a feature – it's a powerful way to drive engagement and build real-time human connection. Whether you're offering live support, virtual events, or online learning, embedding video calls creates a more interactive and personal experience.
With the rise of remote work, online classrooms, and telehealth, video conferencing integration has become critical for businesses and platforms looking to stay relevant and competitive.
For businesses, embedding video calls into a website allows for face-to-face customer engagement without third-party tools. This deeper connection improves support, increases trust, and boosts conversion rates.
In healthcare, embedding secure video calls enables remote consultations and follow-ups, making telemedicine more accessible while maintaining data privacy.
Similarly, it enables telemedicine in healthcare, providing patients with easy access to medical consultations. By leveraging video conferencing, you can successfully add real-time video conferencing capabilities to your website, enhancing your students' or patients' engagement and interaction during online events.
Moreover, internally, video conferencing strengthens team communication, especially in remote setups, ensuring clearer and more empathetic exchanges than text-based communications.
Embedding video conferencing on your website is no longer optional – it’s essential for creating modern, human-centric digital experiences. Whether you're in education, healthcare, sales, or support, real-time video elevates connection, communication, and trust.
How to embed a video conferencing API in 4 steps
- Choose a provider. Pick a video API that fits your needs – prioritise GDPR compliance, customisation and time to integrate.
- Generate your API credentials. Create an account and generate your Developer Key and secret from the provider's dashboard.
- Create a room via the REST API. Send a request to the provider's API to create a room and generate a unique participant token (via JWT or OAuth).
- Embed the interface with the SDK. Install the SDK via npm or a script tag and load the prebuilt video component into your frontend.
The sections below show exactly how to do this with Digital Samba.
How to embed video calls on your website using Digital Samba Embedded
You can add live video conferencing to your website in a few simple steps using Digital Samba Embedded.
Whether you’re looking for a quick HTML embed or full control via our API, this section walks you through your options, from basic to advanced.
Set up a Digital Samba account
First, sign up for a free Digital Samba account.
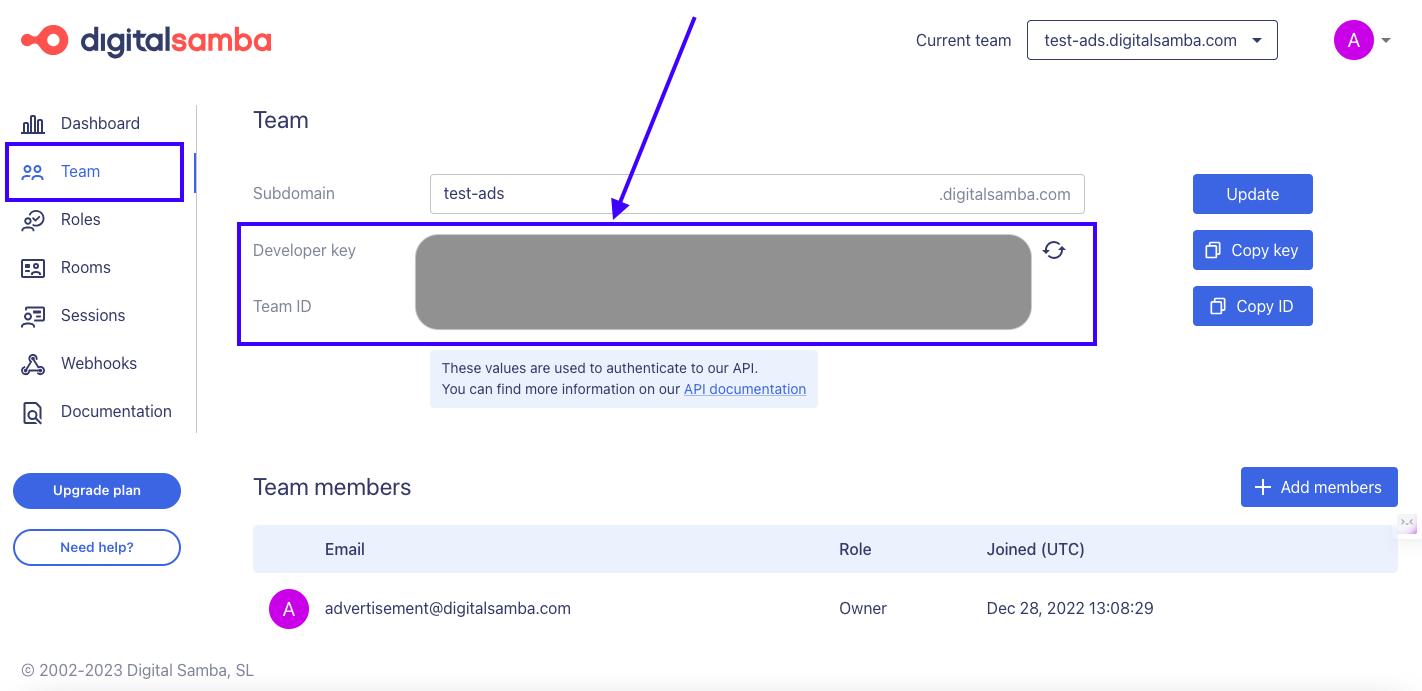
Once you’re in, head to the “Team” section to find your API Key, Team ID, and Developer Key – these are the credentials you'll use to authenticate your requests.
Let's look at how you can embed Digital Samba video conferencing on your website.
Understanding Digital Samba integration options
1. Using the Digital Samba API
You can use it to create rooms, assign roles, and manage video sessions programmatically. This is best if you’re building a custom integration or need to connect video calls with other tools.
2. The HTML iframe embed
If you’re looking for the simplest solution, use an HTML iframe to embed video conferencing directly into your site.
No need for heavy development – just copy, paste, and go live.
This iframe embeds the video conferencing room into your website, enabling live video conferencing capabilities.
3. Digital Samba SDK
For more advanced customisation, use the Digital Samba SDK. It lets you interact with in-room events, control layout, and deeply integrate the video call experience into your frontend code.
Creating a video conferencing room
To create a new video room, you can either use our REST API or do it directly from the dashboard.
The Digital Samba REST API involves executing a POST request to the /room endpoint with your Team ID and Developer Key. Here's an example of a POST request:
This request creates a room and sets its privacy state and available roles.
The privacy settings determine who can access the video conferencing room.
- Public: A public room is accessible to anyone with the link, allowing for broader participation without specific invitations.
- Private: A private room restricts access to only those explicitly invited or with the necessary credentials, ensuring a more controlled and secure environment.
Conversely, Roles define the level of access and control participants have in the room. Remember that a single moderator role is the simplest way to create a room.
- Moderator: Has the highest level of control, including managing participants and room settings.
- Speaker: Can actively participate and present in the room, with some controls over their segment of the session.
- Attendee: Generally has view-only access, with limited interaction capabilities, ideal for general participants in a larger audience.
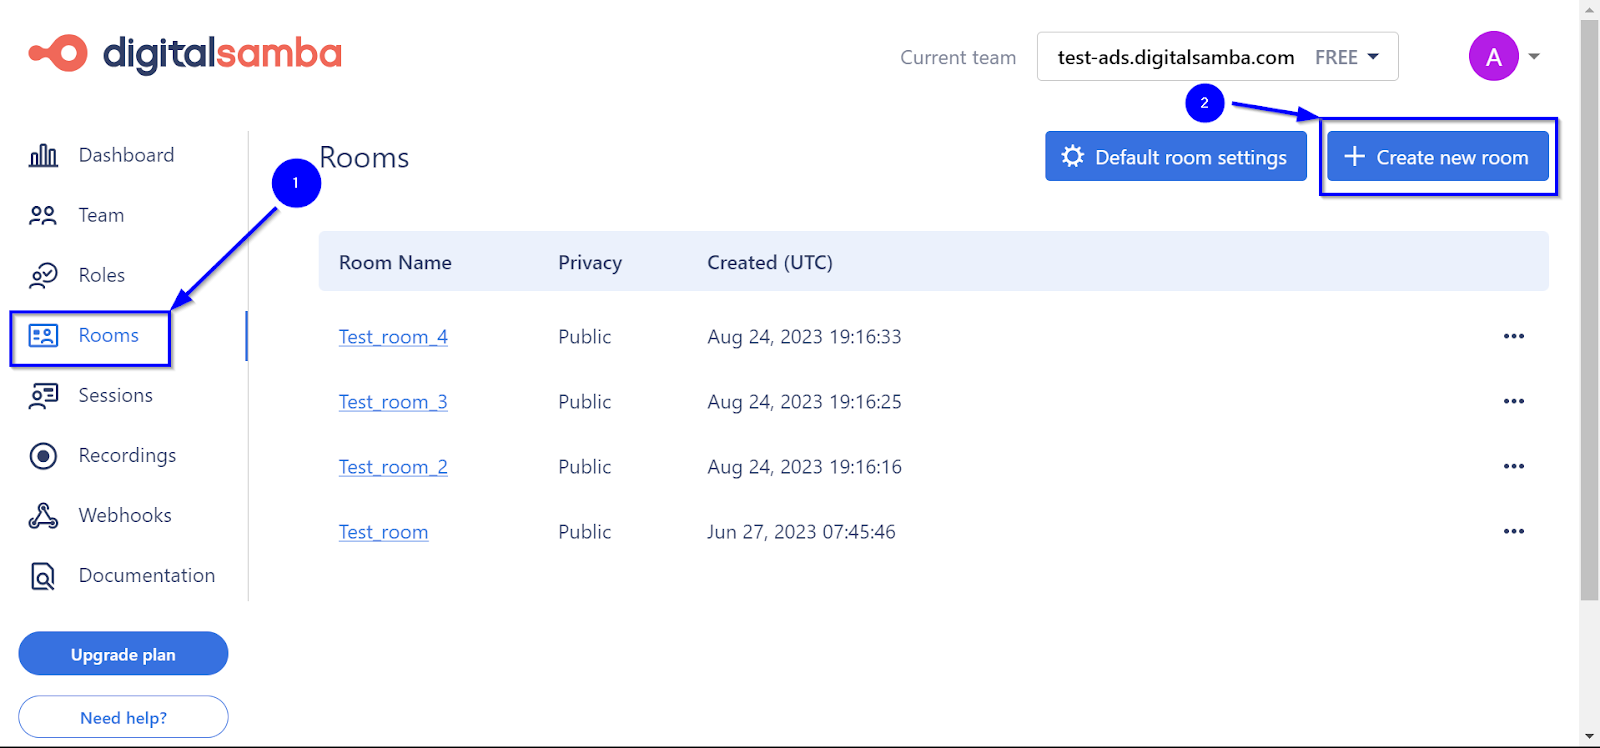
The dashboard, on the other hand, provides a more visual and less technical method to accomplish the same task as illustrated below.
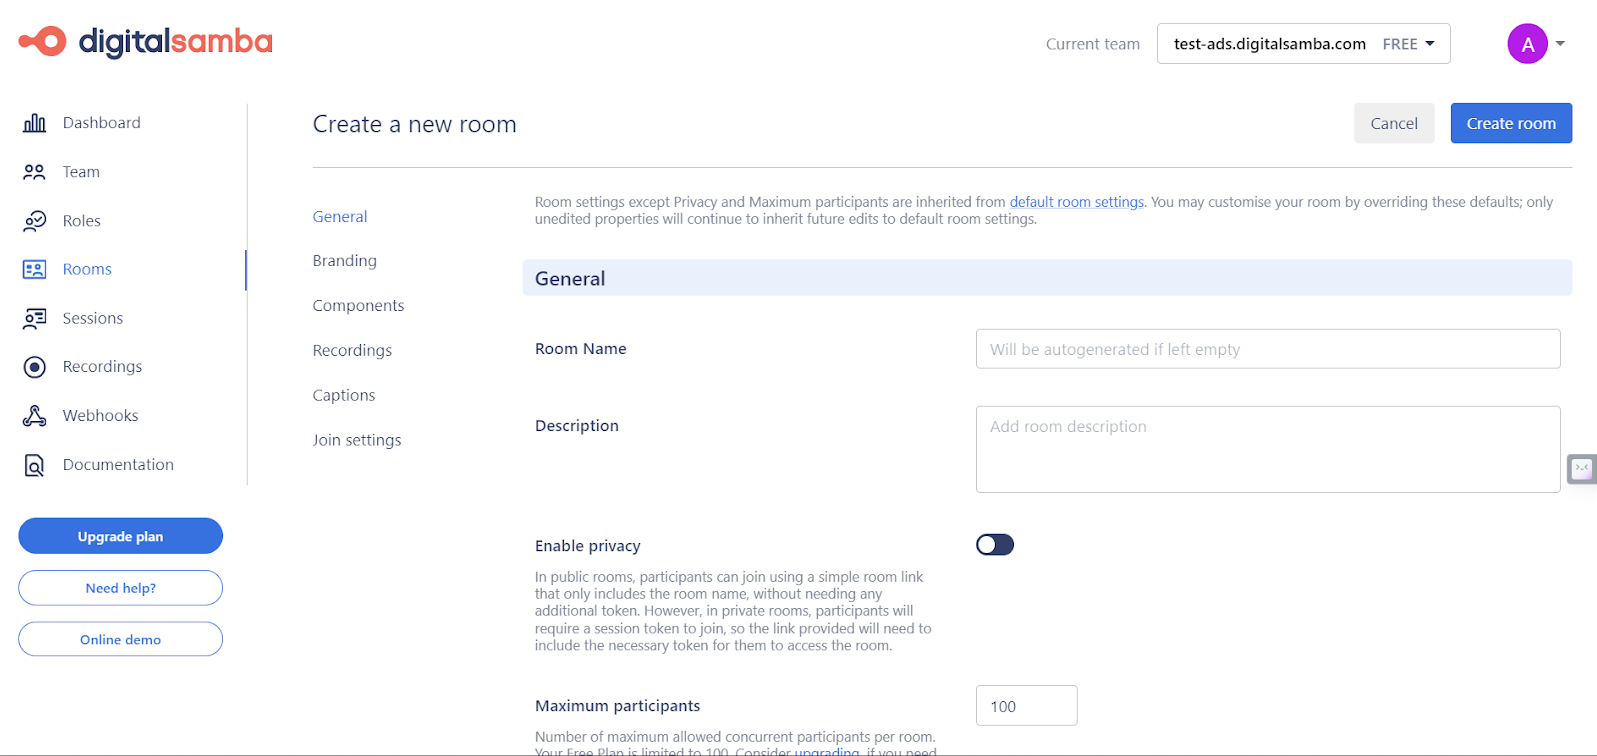
You will then be presented with the Create a new room window, where you can customise your room according to your preference.
Once your room is created, you can embed it on your website using either an iframe or our SDK, depending on how much control you want.
Customise your video call experience with Digital Samba Embedded
The Digital Samba SDK offers a more sophisticated and flexible approach to embedding video conferencing than the basic HTML iframe embed. While the simple HTML embed is excellent for quick integrations, the SDK provides enhanced control and customisation options, allowing for a deeper integration into your website or application.
What are some of the advantages of using the Digital Samba SDK?
- Extended customisation: The SDK allows for more detailed customisation of the video conferencing experience. You can tailor the look and feel of the video conferencing frame to match your website's design and user interface.
- Advanced control: With the SDK, you can access additional controls and features that are unavailable through the basic HTML embed. This includes manipulating room settings programmatically and responding to in-room events in real-time.
- Integration flexibility: The SDK is designed for seamless integration with your existing frontend code, offering a more integrated experience for users and smoother interactions within your application.
For more detailed information and comprehensive documentation on using the Digital Samba SDK, please refer to our SDK Documentation.
Customising the embedded video conferencing experience using Digital Samba SDK
The Digital Samba SDK gives you more control over how your video calls look and feel. From layout and language to in-room behaviour, you can tailor the experience to match your brand and user needs.
Initialisation of the DigitalSambaEmbedded class
Start by initialising the DigitalSambaEmbedded class – this is the core of the SDK. You can either load the room immediately or use the createControl method if you prefer to manage when and how the room appears.
Setting initialisation options (InitOptions)
InitOptions let you configure how the video room is embedded.
You can control the room’s iframe location, pass in the URL or team/room names, and add a JWT token for private rooms. Some of the options include:
- root: Specifies the HTML element where the video frame will be created.
- frame: Allows loading the room in your website's existing iframe element. If not specified, an iframe is automatically created.
- url: The full room URL for the iframe's src attribute.
- team and room: Used for specifying the team and room names instead of the URL.
- token: An optional JWT string for authentication, commonly used for private rooms that make use of roles.
Configuring room settings
Use roomSettings to define what happens when a user joins a room.
These settings include:
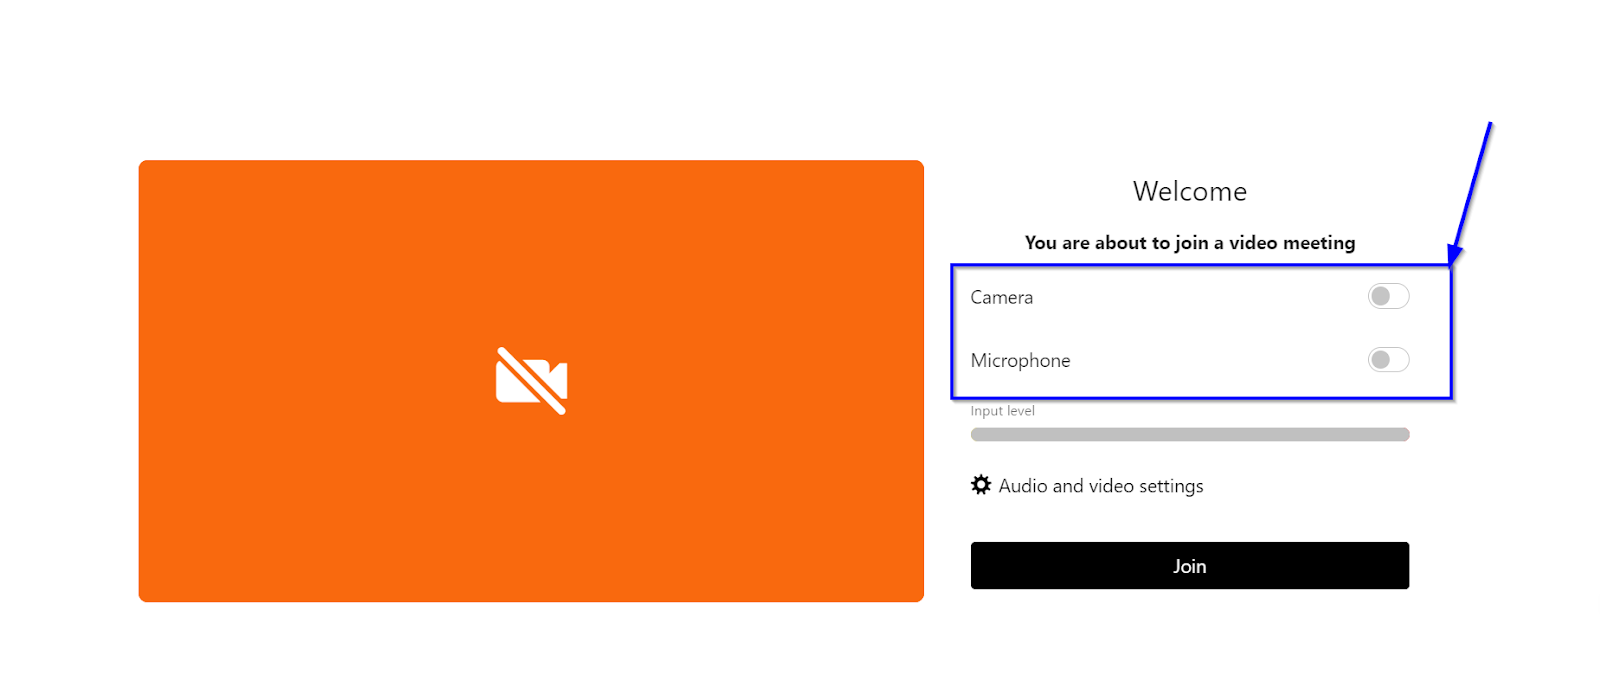
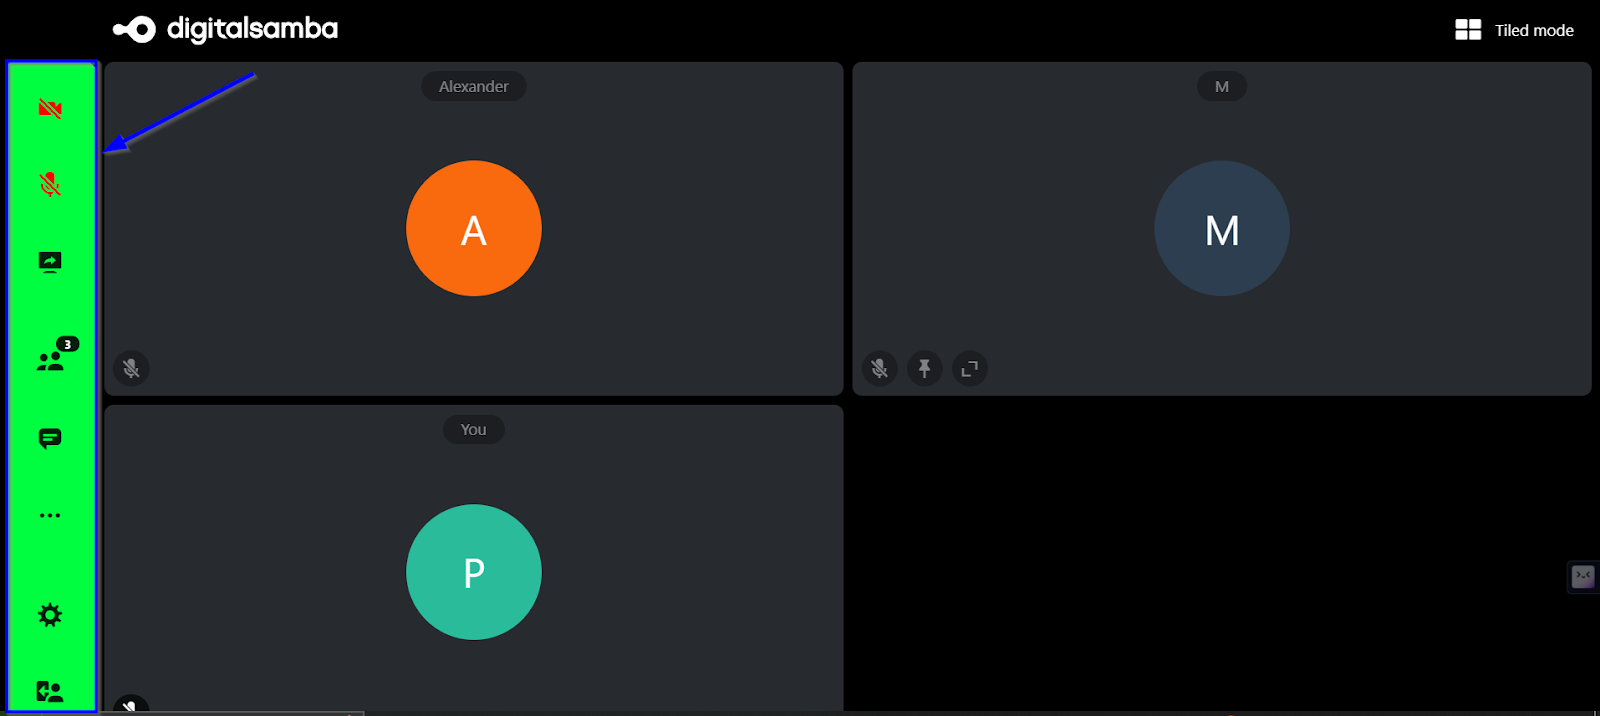
- Enabling or disabling video and audio devices upon entering the room.
- Configuring initial media devices (video input, audio input, audio output).
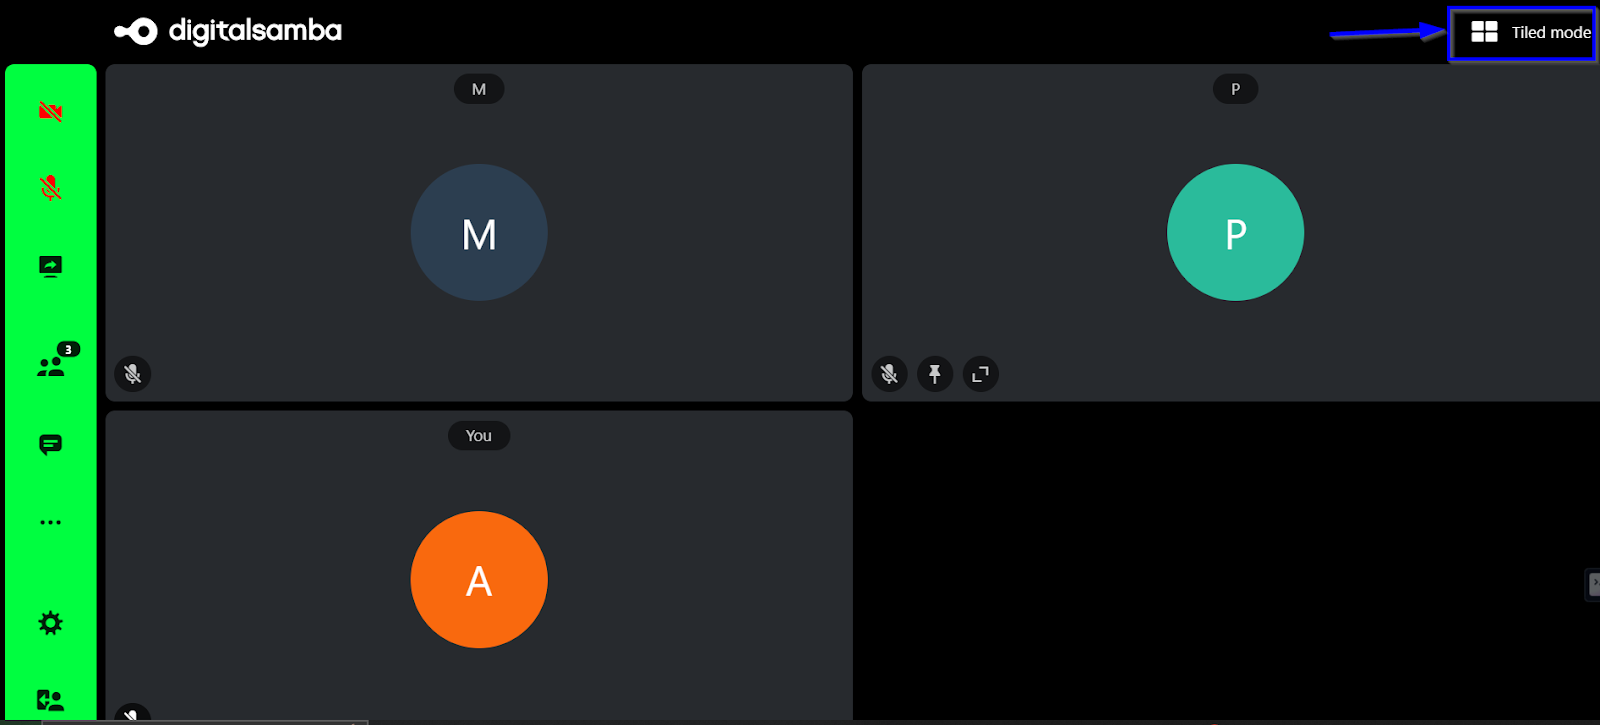
- Setting the app language, user name and custom initials for user tiles and choosing the layout mode (e.g., auto or tiled).
- Setting the visibility of the toolbar and captions panel.
- Setting up virtual backgrounds.
- Muting the frame on join for the local user.
Here is a JSON code example of how to achieve this:
These SDK settings help you create a clean, branded video call setup that feels like a natural part of your site or app.
Loading the room
After setting the InitOptions and roomSettings, the room is loaded using the load method. This final step embeds the custom video conference room into your website, providing a tailored user experience.
Here's a basic example to illustrate the customisation process:
This example demonstrates how to use the Digital Samba SDK to embed a video conferencing room into a specific element on your website, enhancing customisation and user experience. The initOptions are crucial for defining the exact location on the webpage where the video conference will appear.
For more detailed examples and information on the possible initOptions combinations, please refer to the Digital Samba SDK Documentation.
Using SDK events and methods to manage events in real-time
The Digital Samba SDK gives you access to real-time events and control methods, so you can make your video calls interactive and responsive.
From detecting when users join to handling mic access or hand raises, these tools help you manage everything live, directly from your frontend.
Let's explore some examples:
Subscribing to events
You can subscribe to various events to monitor different activities within a video conferencing room. The SDK offers a range of events such as userJoined, userLeft, handRaised, handLowered, audioEnabled, audioDisabled and many others.
You can use the on() method to subscribe to an event and off() to unsubscribe. The once() method is also available for one-time subscriptions. Here's a template for subscribing and unsubscribing to an event:
Handling specific events
Want to show a message when someone leaves the call? Just use the userLeft event.
Here’s a basic example of how to handle that scenario in your app.
You can also track when users turn their audio on or off using audioEnabled and audioDisabled.
This can be helpful if you're managing roles or want to trigger UI updates based on user activity.
Debugging with events
For debugging, you can listen to all SDK events by subscribing to '*'.
This helps log everything in the room – great for testing or development environments.
By utilising these events and methods, you can create a dynamic and responsive video conferencing environment, adapting in real-time to the actions and needs of the participants. This allows for a more controlled and interactive experience during your Digital Samba video conferences.
Using SDK methods to control the call
Besides events, the SDK includes methods to control the video call experience. You can start or stop a camera, end a session, or ask a user to unmute – all from your code.
However, before using any methods, you must initialise the SDK and load the room. It is important to subscribe to the userJoined event to ensure the user is present in the room before calling other methods.
Once the room is initialised and the SDK is loaded, you can utilise various SDK methods to manage the video call. Here's a look at some key methods:
- The enableVideo() method turns on the user's camera.
- The endSession() ends the session for everyone, removing all users from the room.
- The requestUnmute() method requests a remote user to unmute their microphone. The user ID is passed as a parameter, and the remote user will receive a pop-up to accept or deny the request.
Here’s a quick example of how you might use some of these methods in your app.
These methods provide significant control over the video conferencing experience, allowing for dynamic interaction and management of the call. They are essential for creating a custom and responsive video conferencing environment using Digital Samba's SDK.
Add video conferencing to WordPress with the Digital Samba plugin
If you’re using WordPress, you can easily embed GDPR-compliant video calls with the Digital Samba plugin– no coding required. It includes features like screen sharing, live chat, virtual backgrounds, and closed captions, all powered by secure WebRTC video technology.
How to use the plugin
Installation and setup:
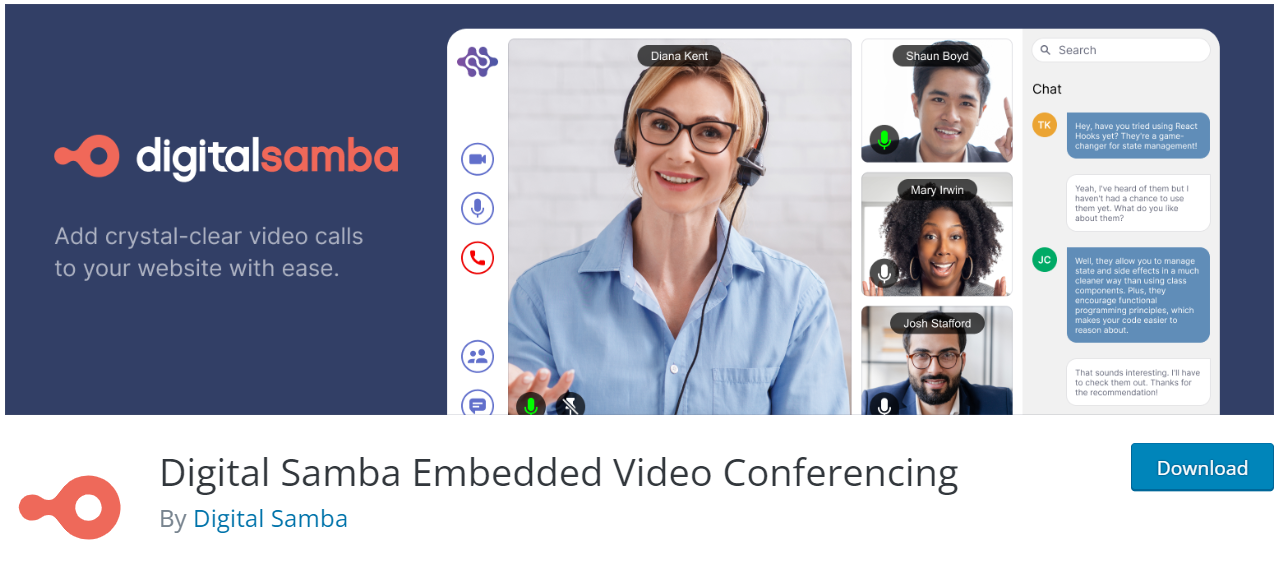
- To get started, install the free Digital Samba Embedded WordPress plugin from the WordPress Plugin Directory.
- Once activated, you’ll need your Developer Key and Team ID – all found in your Digital Samba dashboard.
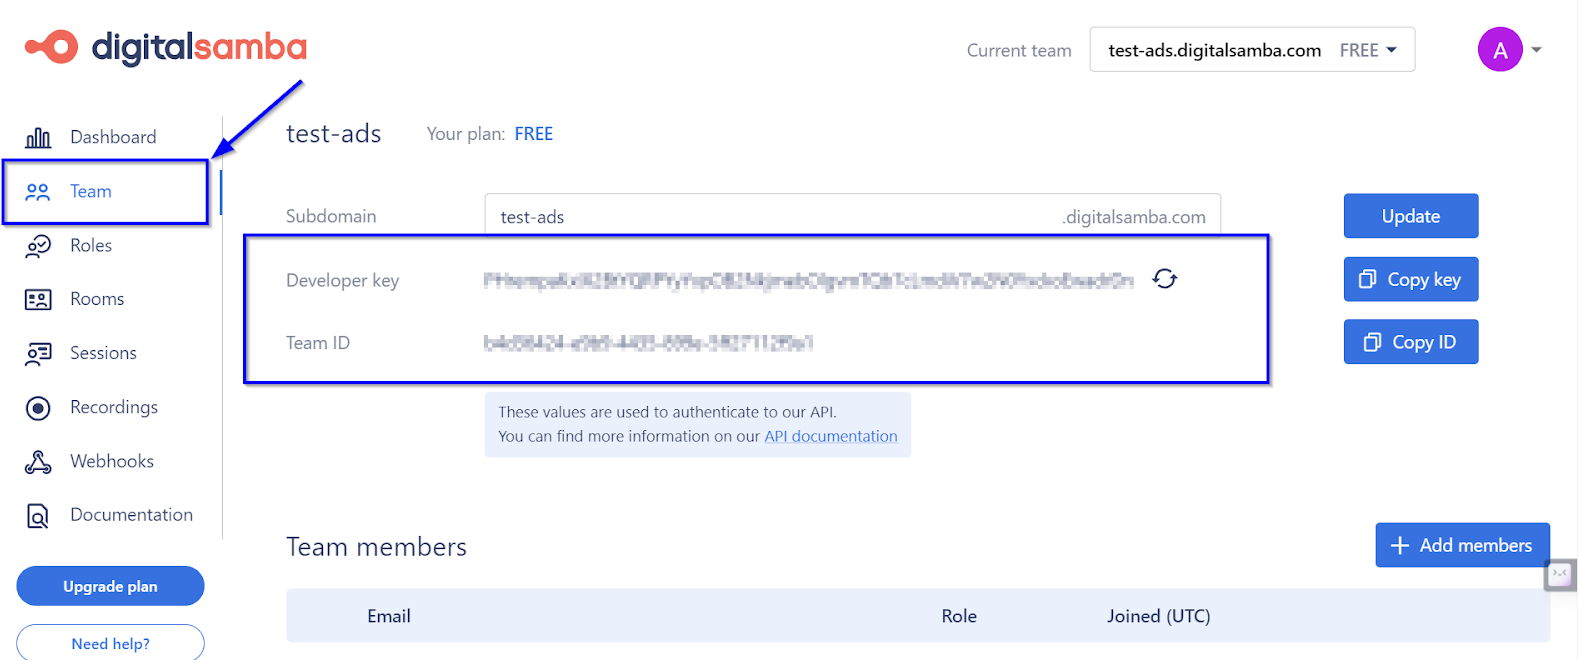
- Go to the plugin settings in WordPress and enter your Team ID, Developer Key, and domain name. Hit “Save Changes” to connect your account.
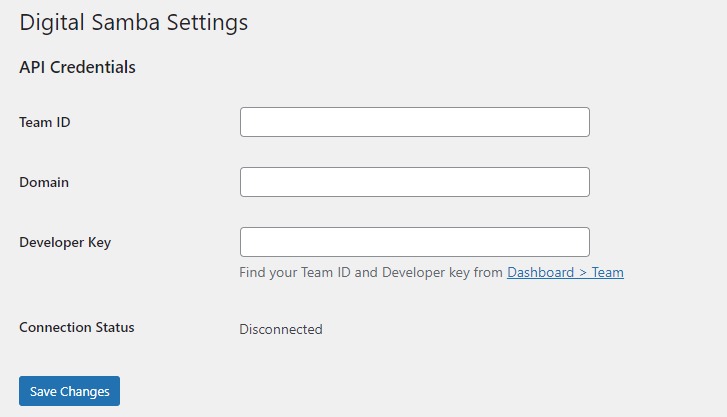
- Save your settings and confirm the connection to your Digital Samba Embedded account.
Creating a room:
- To create a room, click Add New Room in the plugin menu.
- Provide a title for the WordPress post for easy reference.
- Name your room within the plugin interface.
- Customise room colours and other parameters according to your design preference (helpful descriptions are available for each option).
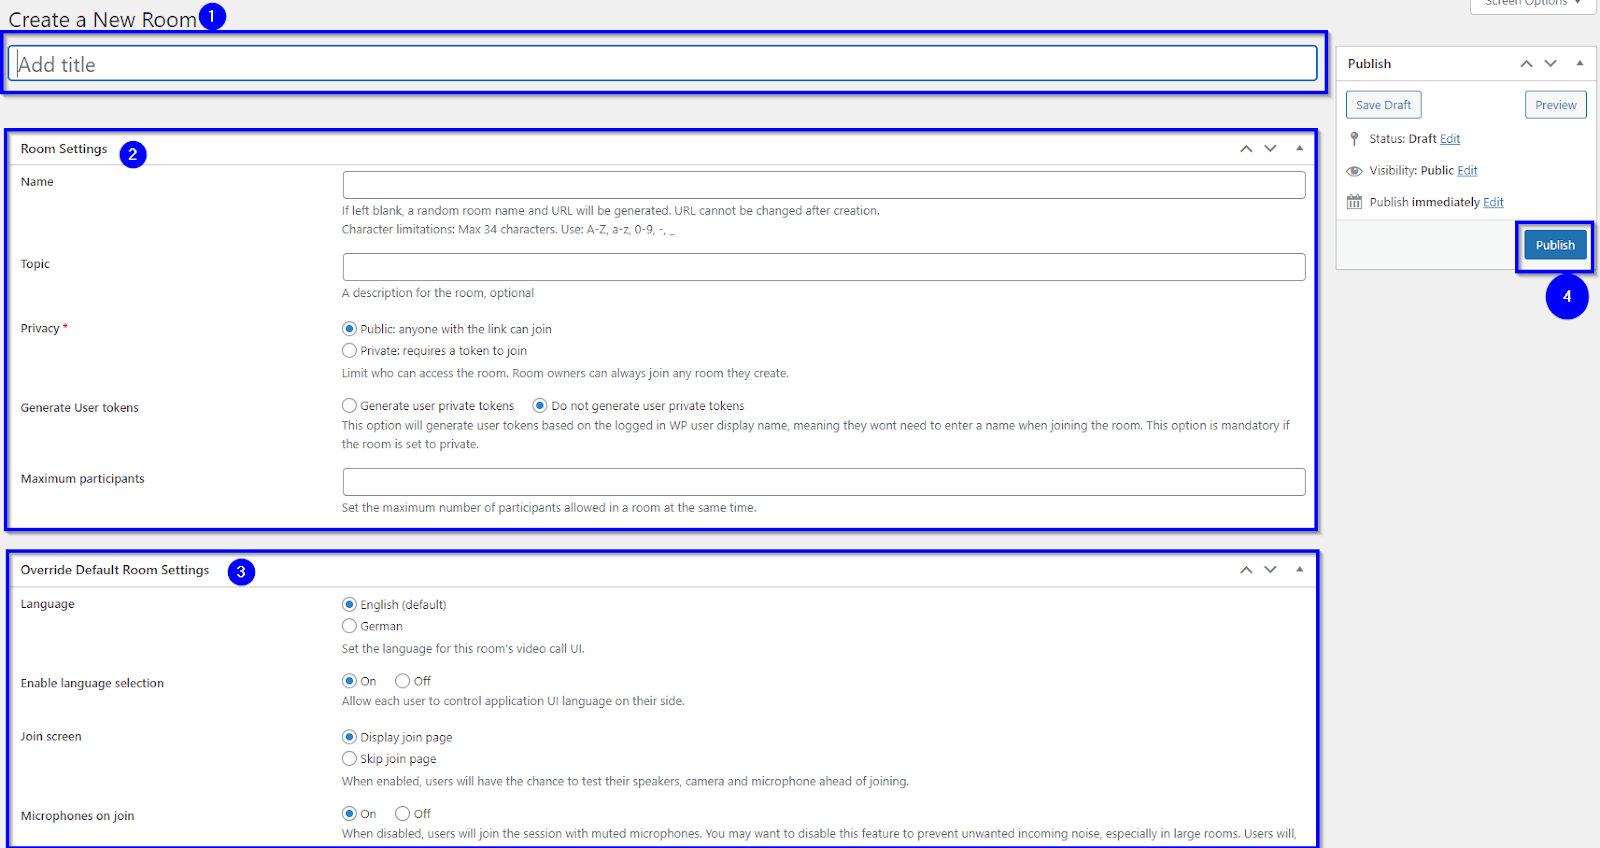
- Click Publish to create your room.
Embedding the room
- Each room you create gets a unique shortcode. You can use this to display the room on any page or post – just paste it into the WordPress editor.
- You can either use the room immediately via its permalink or embed it into other WordPress pages using the generated shortcode. Here is an example of a published room on the WordPress website.
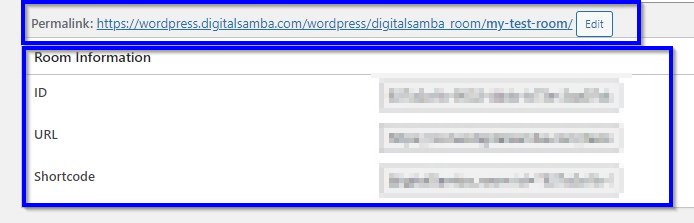
- This flexibility allows you to control room visibility, whether for logged-in users or based on specific content restrictions. You can explore more on how to use shortcodes on the WordPress documentation.
Take your website further with embedded video conferencing
In this guide, you’ve learned how to add secure, high-quality video conferencing to your website using Digital Samba. Whether you’re a developer looking to work with our API and SDK or a WordPress user wanting a no-code solution, integration is fast, flexible, and fully GDPR-compliant.
With features like screen sharing, closed captions, and virtual backgrounds, Digital Samba gives you everything you need to deliver a seamless video experience – right inside your app or site.
Ready to bring real-time video to your platform?
Start building with Digital Samba today, or talk to our team about the best way to integrate video conferencing into your website.
FAQ: How to embed video conferencing on your website
1. What is an embedded video conferencing API?
An embedded video conferencing API lets you add real-time video calls directly to your website or app without building WebRTC infrastructure yourself. You use the API to create rooms and manage participants on the backend, and an SDK to display the video interface on the frontend.
2. How do I embed a video call on my website?
To embed a video call on your website, create a room via the Digital Samba REST API, generate a participant token, then load the prebuilt video interface with the JavaScript SDK or a simple iframe. No WebRTC development is required, and a basic embed can be live in under an hour.
3. What is the fastest way to embed video chat into my website?
The fastest way to embed video chat is to use an iframe embed. Generate the room link and paste the iframe code into your HTML, with no development required.
4. What is the difference between a video conferencing API and an SDK?
A video conferencing API manages backend tasks such as creating rooms and setting participant roles, while the SDK controls the frontend, including how the call looks and behaves on your site. Most integrations use both together.
5. What credentials do I need to access the API?
To use the Digital Samba video call API you need a Team ID, Developer Key and API Key, all available once you create an account.
6. Can I preview the Digital Samba API before paying?
Yes. Digital Samba offers a free plan so you can test the API and video SDK with no upfront cost and no card required, which is the easiest way to try embedding video calls before scaling.
7. Can I embed a video call into a WordPress site?
Yes. Digital Samba provides an official WordPress plugin that lets you add fully functional video rooms using shortcodes, with no coding required.
8. Is Digital Samba GDPR-compliant?
Yes. Digital Samba hosts all data on EU servers, offers end-to-end encryption and complies fully with GDPR, making it suitable for healthcare, education and enterprise.
9. How many users can join a Digital Samba video meeting?
Digital Samba supports large group calls with hundreds of participants, displaying up to 49 video streams on screen at once, depending on your plan.
10. Can I brand the embedded video interface?
Yes. Digital Samba's white-labelling options let you customise logos, colours, fonts and even the domain, with the SDK providing deeper branding control.
11. Can I use Digital Samba in an HTML5-based hybrid app?
Yes. Digital Samba integrates into HTML5 hybrid apps, making it suitable for mobile frameworks such as Ionic, Cordova and Capacitor.
12. Can I pre-fill the nickname field and skip the join screen in an iframe?
Yes. When embedding a room with an iframe, you can use query parameters to pass the user's name and bypass the join screen.
13. Can I set participant broadcast permissions by default?
Yes. You can configure default participant roles, including broadcast permissions, when creating rooms via the Digital Samba API or dashboard.
14. Does Digital Samba have API documentation?
Yes. Full developer documentation is available at docs.digitalsamba.com, covering the video conferencing API and SDK.
Share this
Twilio Video vs Digital Samba: Why Developers Are Choosing a Low-Code Video API

How to Embed a Video Conference Widget with the Digital Samba SDK