Configuring team settings can be a crucial step in optimising workflow and productivity in your video conferences. One way to do this is by using an API, which provides you with a more granular way to customise your digital interactions.
Table of Contents
- How do you get started?
- How do you add members to your team?
- How do you assign team roles to team members?
- How to configure your default room settings
In this article, we'll explore how to configure your team settings using the Digital Samba Developer API. We’ll go through a step-by-step guide on how to set up your team, assign team roles and how to configure your default room settings.
How to get started?
Before we delve into configuring your team settings using the Developer API, it's important to remember that much of the setup process will actually take place through the dashboard. But before we get into the nitty-gritty details of team settings, let's start by defining what a team is in the context of Digital Samba.
A team in Digital Samba refers to a group of individuals who collaborate on integrating the Digital Samba Embedded into a website or application. This team typically includes developers, as well as any other users who need to manage and configure your rooms at an advanced level.

Contact our team today!
Configure your team settings with the Digital Samba Developer API
To function effectively within Digital Samba, each team must have at least one designated owner. Additionally, teams may also include one or more administrators and members, depending on your specific needs and requirements.
How do you create a team?
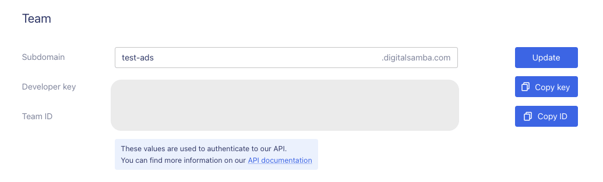
The first step in setting up your team is creating a room. When you sign up for a Digital Samba account, a team will be created automatically. As part of the sign-up process, you'll also be asked to set up your team by adding a subdomain, which serves as a unique identifier for your team.
Digital Samba will then use your subdomain to create a branded domain displayed in the link you use to invite participants to virtual meetings.
For instance, if you use ‘lecture-room’ as your subdomain, your branded subdomain will be - https://lecture-room.digitalsamba.com/room. You can edit your subdomain later if need be.
How to authenticate REST API requests when creating a room
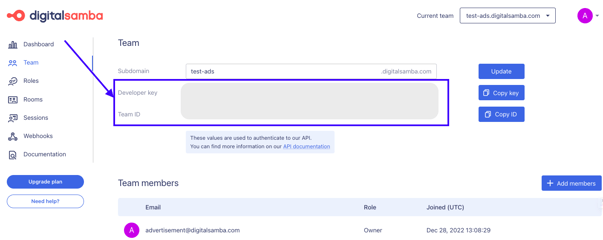
During the sign-up process, you'll also be provided with your developer key and team ID, which are essential for authentication when making requests to the Digital Samba REST API. Don't worry if you miss this step; you can easily access your developer key and team ID later by navigating to the Room window on your dashboard.
To see your team settings and room settings in action, you'll need to create a room. To do this, you'll need to make a POST request to the v1/rooms endpoint. First, you'll need to use your developer key and team ID to authenticate the request. Here's an example of how to make a POST request:
IMPORTANT: Avoid sharing your developer key with external sources or embedding it in front-end code. You should treat it with the same caution as a password, safeguarding it as diligently as your other confidential information and secrets.
The POST request you just sent will create a new room with the default room settings. We’ll cover how to configure your default room settings in a later section.
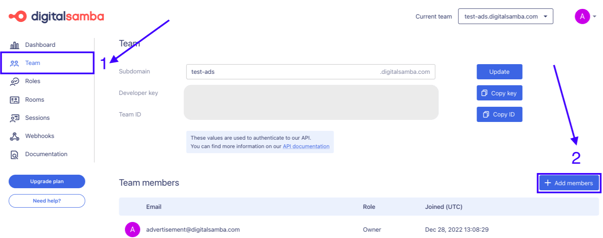
How do you add members to your team?
Now that you've set up your sub-domain and created a new room, it's time to add members to your team.
One great feature of Digital Samba is that it automatically generates a default demo room for each team that signs up. This means you can conveniently try out your team settings without the need to create a new room from scratch.

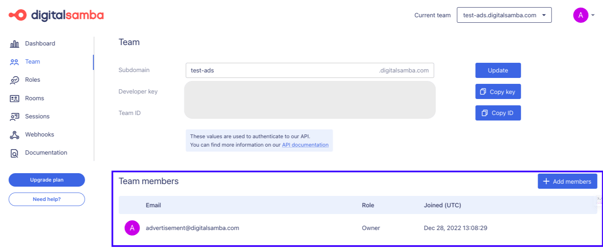
To add team members, simply head over to the 'Team' window and click the 'Add member' button.
You’ll then be presented with an invite link that you can copy and send to invite your team members. The link will direct them to the Digital Samba sign-up page where they can sign up as a team member.
How do you assign team roles to team members?
As a new member, you'll see yourself listed in the ‘Team Members’ section with your work email address, role, and joining date. The team owner role is auto-assigned to the user who creates the team.
Team roles and permissions
Digital Samba offers three team roles: owner, admin, and member.
- The team owner is created automatically when a new team is formed and has complete control over managing the account, including billing and product upgrades.
- Team admins have similar privileges to the team owner but cannot manage to bill or remove the team owner. They can add and remove team members and assign team roles.
- Team members can participate in all activities except adding or removing team members, assigning roles, and configuring room defaults.
There can be an unlimited number of admins and members in a team but only one team owner, making collaboration and delegation of tasks efficient. You can explore more about the team roles and permissions on our documentation.
How do you assign team roles and promote or demote your team members?
To assign a team role, simply click on the three dots next to the team members' details in the Team window.
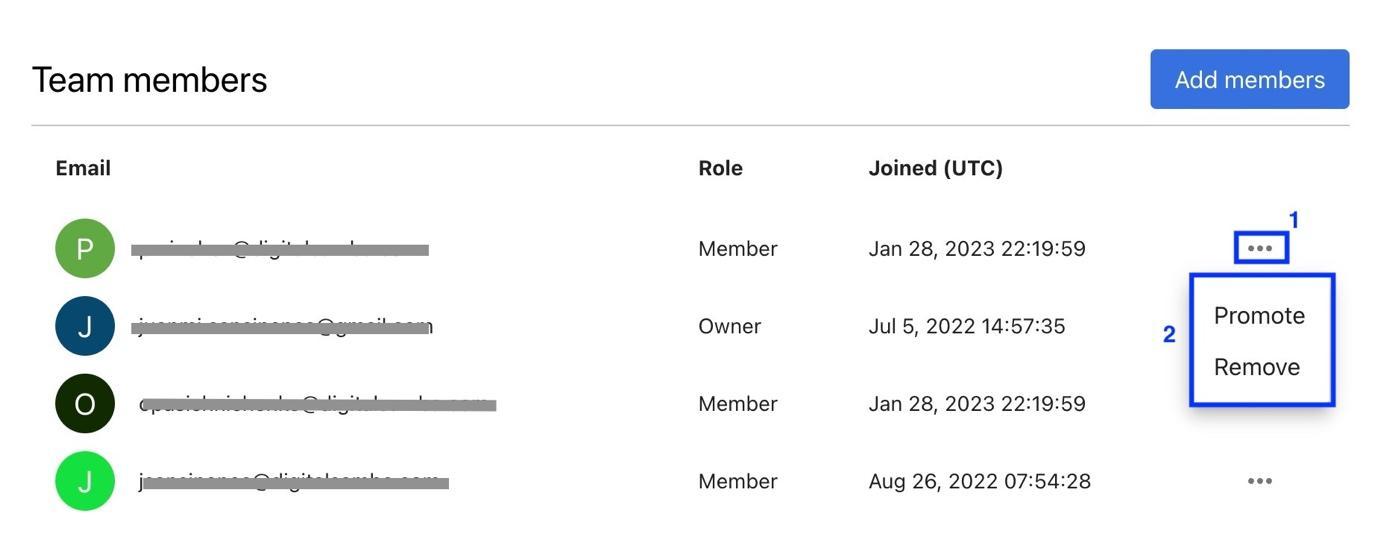
As a team owner, you'll have several options for managing team membership. You can promote a team member to a team admin by selecting the ‘Promote’ option. Conversely, you can demote a team admin to a team member using the ‘Demote’ option.
Additionally, you can remove team members entirely using the ‘Remove’ option. These options give you flexibility in managing your team's structure and roles.
How to configure your default room settings
After setting up your team, you can customise your default room settings to suit your needs. These settings serve as a foundation for newly created rooms, so it's important to configure them properly to maintain a consistent look and feel across all your rooms. This will help reinforce your brand identity and create a cohesive environment for your team.
With the Developer API, you can see or edit the default room settings for your team.
How to view your current default room properties
Before you start configuring your default room settings, you have the option to view and review the current properties. To do so, simply make a GET request against the root/ endpoint, as follows:
This will return a list of the current default room properties, which you can then use to inform your configuration decisions. Here’s an example of a response with a few set properties such as an enabled toolbar, toolbar positioned at the bottom and the layout mode on join set to tiled among other properties.
How to configure your default room settings with the Digital Samba Developer API
To configure your default room settings, you must execute a PATCH request against the /api/v1 endpoint, as highlighted below.
For example, suppose your goal is to ensure a uniform brand identity throughout your video conferences. In that case, you can achieve this by implementing the following settings: position the toolbar on the right and colour it blue to match your brand's primary colour, use a light blue hue as the primary colour and set the background to white for minimal distractions, enable chat for seamless communication and select English as the UI language for universality.
With the Digital Samba video conferencing API, you can update as many fields for your room settings as you wish. See our documentation for a more detailed list of the fields you can configure.
With your team settings in place and you’ve configured your default room settings to match your brand, your participants and team members can now seamlessly engage in virtual communication, fostering effective collaboration and shared understanding.
Create your virtual conferencing team today with Digital Samba leveraging our Developer API.
Get started today with a free account and 10,000 free participant minutes of HD-quality video calls.
Share this
We taught AI assistants how to build video apps. Properly.

How to Use Custom Roles in Digital Samba Developer API