

Digital Samba abre la puerta a un reino de colaboración interactiva. Con sus versátiles Salas y Sesiones, puedes conectarte, comunicarte e interactuar a la perfección con equipos, clientes y socios.
Índice
- Registrarse
- Iniciar una sesión en tu sala de demostración
- Probar las funciones de la sala y sus diferentes capacidades
- Crear y configurar una nueva sala
- Veamos un ejemplo
Esta guía profundiza en las infinitas posibilidades de las Salas y Sesiones, proporcionándote los conocimientos esenciales para aprovechar todo el potencial de Digital Samba.
Regístrarse
Para empezar a utilizar Digital Samba, sigue estos pasos:
- Visita la página de registro de Digital Samba en:
https://dashboard.digitalsamba.com/signup
- Rellena la información requerida para crear tu cuenta. Esto incluirá tu dirección de correo electrónico del trabajo y tu contraseña.
- Durante el proceso de registro, tendrás la oportunidad de crear tu subdominio. Elige un nombre de subdominio único y memorable que represente a tu organización o el propósito de utilizar Digital Samba.
Una vez completado el proceso de registro, accederás a tu panel de control.
Aquí es donde puedes gestionar tu cuenta de Digital Samba y acceder a las distintas funciones y configuraciones.
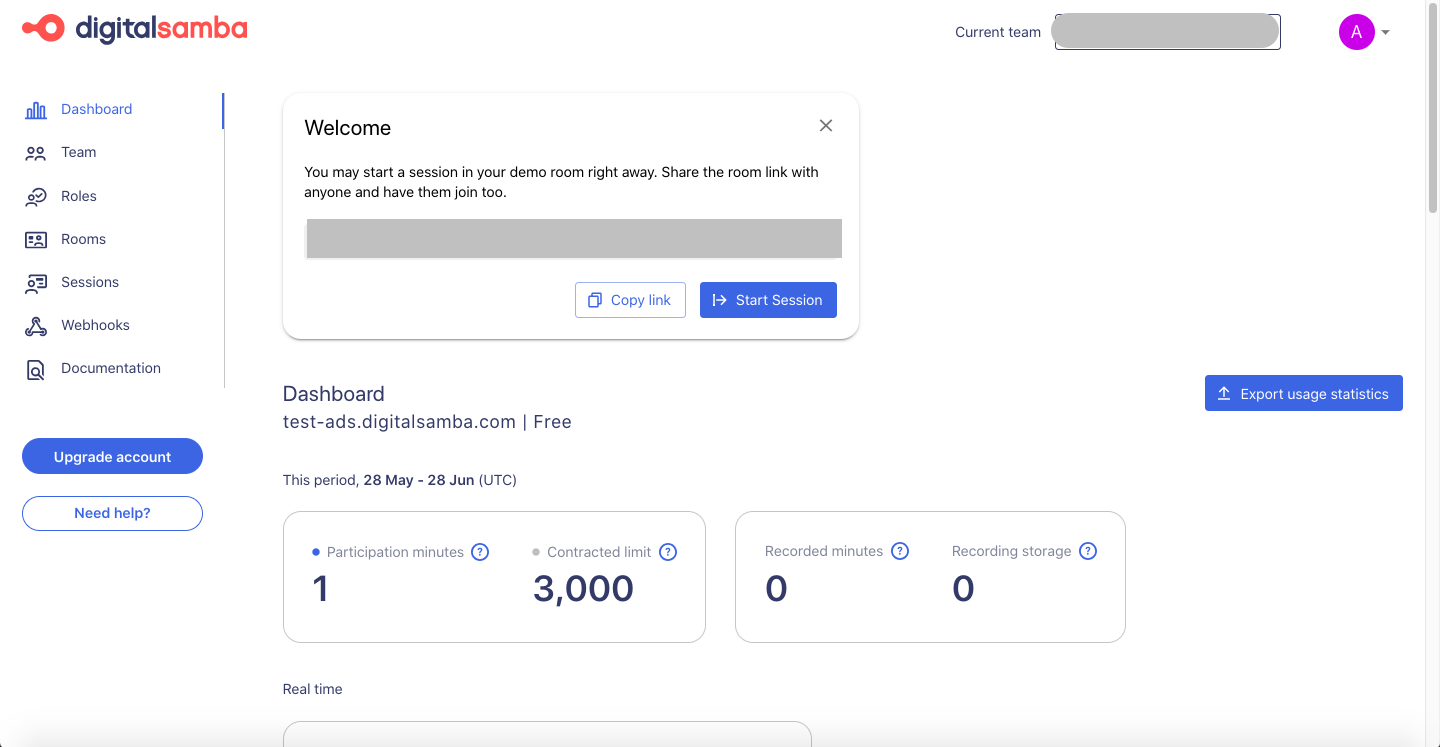
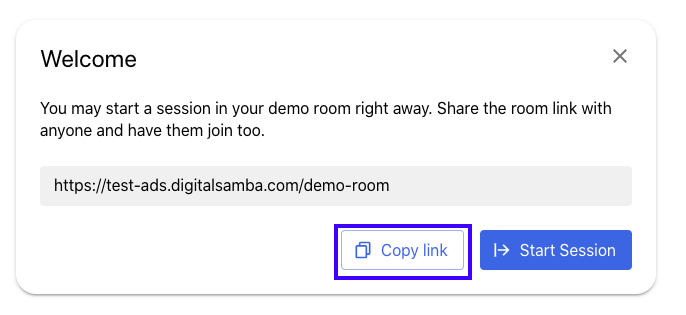
Iniciar una sesión en tu sala de demostración
En Digital Samba, es crucial entender los conceptos de "sesiones" y "salas". Aclaremos qué significan estos términos:
Entremos de lleno y crea tu primera sesión en la sala de demostración
Para sentir la experiencia de la videoconferencia y probar la calidad HD y la interfaz de usuario de Digital Samba, sigue estos pasos:
1. Accede a tu panel de control de Digital Samba iniciando sesión en tu cuenta de Digital Samba.
Haz clic en el botón 'Iniciar sesión' para iniciar una sesión en la sala de demostración.
Para añadir participantes a tu videoconferencia, simplemente copia el enlace de la sesión y compártelo con quien desees, independientemente de que pertenezcan a tu equipo u organización.
Antes de asistir a una sesión, Digital Samba te pedirá que pruebes la configuración de la cámara, los altavoces, el micrófono y el fondo virtual para asegurarte de que están configurados y funcionan correctamente.
Sin embargo, ten en cuenta que la función de fondo virtual no está disponible en ningún dispositivo móvil ni en el navegador Safari.
Ten en cuenta que la sala de demostración es una sala preestablecida diseñada para el uso de tu equipo. Sin embargo, Digital Samba ofrece una mayor flexibilidad para personalizar las salas según tus requisitos específicos. Exploraremos la personalización de salas en las siguientes secciones.
Probar las características de la sala y sus diferentes capacidades
1. Probar la cámara, los altavoces y el micrófono antes de unirse a una videoconferencia
Antes de sumergirse en las videoconferencias, es crucial asegurarse del perfecto funcionamiento de la cámara, los altavoces y el micrófono por varias razones, entre ellas:
- Proporcionar una experiencia fluida
- Garantizar una comunicación clara
- Solucionar posibles problemas
- Mantener una imagen profesional
- Garantizar una reunión virtual fluida
Para asegurarte de que todo funciona correctamente, realiza una prueba de audio y vídeo antes de unirte a cualquier videoconferencia, como se ilustra en el siguiente vídeo.
Esto te dará seguridad y te permitirá solucionar cualquier posible problema de antemano.
Ponte en contacto con nuestro equipo hoy mismo
Incorpora videoconferencias realmente conformes con el GDPR en tu sitio web o aplicación
2. Elegir una cámara, un altavoz y un micrófono
Antes de entrar en una sesión, Digital Samba te permite elegir la cámara, el altavoz y el micrófono que deseas utilizar en una videoconferencia. Para ello, simplemente
- Selecciona la cámara, el altavoz y el micrófono que prefieras. Puedes elegir entre las cámaras, altavoces o micrófonos integrados o conectados.
- Realiza pruebas de audio y vídeo para asegurarte de que todo funciona antes de unirte a una videoconferencia.
Una vez que estés en una sesión y dentro de una sala en Digital Samba, puedes empezar a explorar y probar las distintas funciones y capacidades.
He aquí algunos elementos clave en los que centrarse:
1. Probar las funciones
1.1. Alojar a varios participantes
Puedes alojar sin problemas hasta 100 participantes simultáneos en nuestros planes de bajo nivel. Tanto si organizas una pequeña reunión de equipo como una conferencia a gran escala, nuestra sólida infraestructura garantiza una colaboración fluida y sin interrupciones para todos los asistentes.
1.2. Visualizar múltiples mosaicos de participantes
Las sesiones de Digital Samba Embedded muestran un máximo de 49 mosaicos del streamer en una sola página, lo que le permite ver hasta 49 caras o mosaicos/pantallas de participantes a la vez.
A continuación, puedes navegar a la página siguiente para ver más mosaicos, lo que permite una experiencia fluida con hasta 100 participantes en total (a partir de julio de 2023).
1.3. Silenciar y anular el silencio de los participantes
También tienes la posibilidad de silenciar y apagar directamente los micrófonos y las cámaras de los usuarios, lo que te permite controlar los ajustes de audio y vídeo. Es más, para cada participante también puedes solicitar cómodamente a los demás participantes que anulen el silencio de sus micrófonos y enciendan sus cámaras.
1.4. Screen share
Explore the ability to share your screen and present documents, slideshows, or any other content to the participants. This feature is also accessible in the free version of Digital Samba.
1.5. Chat
Chat with participants using the text messages in the chat function. Share important links, ask questions, or provide additional information during the session.
While using a specialised chat application like Slack can be beneficial, having access to an in-room chat is always valuable as it helps us maintain focus during the video conference.
1.6. Hand raise
Test the hand raise feature to signal your desire to speak or ask a question. This helps in maintaining orderly discussions and allows the moderator to manage participant engagement effectively.
1.7. Additional features
If you are using a paid plan, explore extra features such as cloud recordings that allow you to save your video conferences for future reference or sharing.
2. Experience different modes - auto mode & tiled mode
You can also experience the differences between the two layout modes offered by Digital Samba.
- In auto mode, the system automatically adjusts the layout based on the number of participants.
- While, in tiled mode, you can enjoy features like tile pinning, expanding tiles to full screen, dragging handles to rearrange tiles, or minimising your tile for better viewing flexibility.
- Digital Samba also offers a convenient ‘Minimise Your Own Tile’ feature. With this capability, you can easily minimise or maximise your tile, optimising screen space to accommodate other items more effectively.
3. Participants' panel
Familiarise yourself with the participant's panel, which allows you to remotely manage participants through:
3.1. Camera control
You can take control of other participants’ cameras by easily turning them off to prevent any distractions.
Moreover, to maintain focus during sessions, you have the option to silently request participants to unmute their microphones and turn on their cameras. The same applies to turning off their camera or microphone.
3.2. Remove participants
In certain situations, you may need to remove a participant from the video conference. Use this function carefully and judiciously.
Settings panel
From the settings panel, you can personalize your session by setting your preferred language for the user interface, configuring virtual background settings, and selecting your preferred camera, microphone and speaker device according to your preferences.
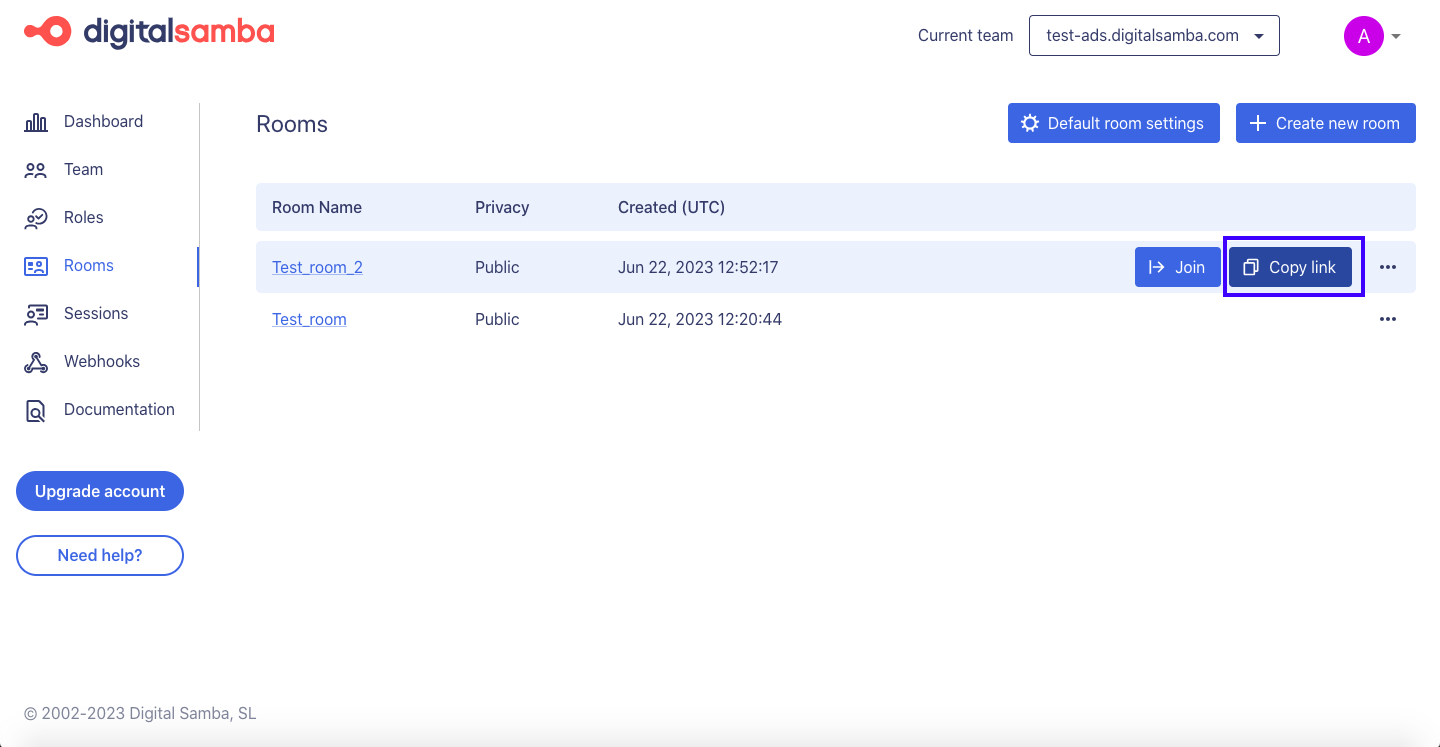
Create and configure a new room
To create and configure a new room in Digital Samba, follow these steps:
- Go back to the Digital Samba dashboard.
- In the Rooms section, click on the ‘Create a new room’ button.
Digital Samba provides extensive customisation options for each room, organised into five subsections. Also, keep in mind that features and functionality come with a well-detailed description of their capabilities next to the feature.
General settings
In the general settings, you can:
- Give your room a descriptive name,
- Set the privacy level (choosing between public or private sessions),
- Define the maximum number of participants allowed in the room,
- Specify the default language for the room interface, and
- Enhance security by enabling end-to-end encryption for the room.
Branding settings
Customise the visual branding of your room by:
- Choosing the primary colour for buttons and interactive features,
- Selecting a background colour,
- Deciding between a light or dark theme for the session’s panels, modals and join screen,
- Adjusting the colour and position of the toolbar within the room.
Components settings
Configure the availability of various components within the room. These include::
- Screen sharing,
- The participant's panel,
- Chat,
- The raise hand feature,
- Virtual background,
- The toolbar,
- The pinning feature,
- Full-screen,
- Minimise own tile, and
- ‘Join’ and ‘Leave’ notifications.
Recordings settings
Customise settings related to room recordings. You can:
- Enable or disable the recording feature for the room,
- Enable or disable the show logo in recordings for displaying your logo in the recording,
- Choose between auto or tiled layout mode for recordings, and
- Decide whether to display name badges on recorded sessions.
Join settings
Configure settings for participants joining the room.
- Allow participants to select and test their devices or bypass the testing process before joining,
- Enable or disable participants' microphones upon joining,
- Enable or disable participants' cameras upon joining,
- Choose between auto or tiled layout mode for participants joining, and
- Specify whether participants' video tiles are automatically minimised upon joining.
Once you have completed the configuration, save your changes. Your newly created room will be listed in the ‘Rooms’ section, allowing you to join it directly or copy the room link to invite others.
Please note that this option is only available for rooms with a privacy level set to public. It is not applicable to private rooms.
Let’s have a look at an example
Let’s say you want to create a room that will have around 40 participants. As the moderator you want your room to have the following settings
- Set the default language to English
- Set the default role for participants as Attendees and add a Moderator role.
- Set the primary colour of your room to blue and the background colour to green
- Set the appearance to a dark theme
- Position the toolbar to the right
- Enable: screen share, chat, access to the participant's panel, pinning features and recording capabilities.
- Disable: the microphone and camera when a user joins a conference.
From the example video above, you can now view how your personalised settings have been implemented in the room. In addition to setting your brand’s colour, your participants can share their screen, chat, access the participant’s panel as well as pin the participants they want to view on a larger tile.
Once you are satisfied with your room settings, you can now copy and send the invite link to your participants. As mentioned before, please note that this option is only available for rooms with a privacy level set to the public. It is not applicable to private rooms.
Congratulations!
You have now successfully created and configured a room in the Digital Samba dashboard, empowering you to integrate it into your workflow. Stay tuned for our upcoming topics on how to make the most of the different features offered by Digital Samba.
Share this
Cómo configurar tus Salas Digital Samba utilizando Dashboard
Cómo configurar tus Digital Samba Rooms utilizando la API para desarrolladores y el SDK